
Capturing imagination: The art of toy photography


Toy photography is an enjoyable and imaginative hobby that combines the pleasure of play with the art of photography. It allows enthusiasts to capture images of their favourite toys in interesting environments, bringing them to life in ways that evoke both nostalgia and creativity.
The Joy of Toy Photography
One of the most appealing aspects of toy photography is the sheer fun that comes with it. Whether you're using action figures, dolls, or miniature vehicles, the possibilities are endless. Each toy can tell a story, and through the lens of a camera, these stories can be vividly portrayed.
The joy lies not just in the final images but also in the entire creative process—from setting up the scene and choosing the right angles to experimenting with lighting and backgrounds.
Examples of Toy Photography
Scroll down to view some examples of toy photography that I created.
Building a mini world with Lego
I like to set up scenes that match the size of the subjects in my photos. I usually start by focusing on where the toys' feet go. By placing them in snow, sand, soil, or similar surfaces, I create a base that makes the rest of the world seem smaller.
For example, if you put a Lego figure next to big things like grass blades or wood grooves, it can remind people of the bigger world outside, breaking the tiny world illusion. I prefer keeping the fantasy alive by building a world that fits their size, so I always begin with a surface that works with their feet.

Lego ski figure
Props used:
Lego ski toy
Baking soda for the snow
Model trees
Cardboard defocussed to create the mountains
Techniques:
I physically sat at the left side of the frame and blew into the powder with a straw. Thus, creating the effect of a burst of snow as the ski man travels down the slopes.

Jumping Lego bike
Props used:
Lego motorcycle toy
A curved fallen tree / log to appear as a cliff
Techniques:
I wedged a stick between the bike and log to separate the bike from the ground. I later removed the stick using post production techniques to make the vehicle look like it was jumping and airborne

Lego bio hazard
Props used:
Lego biohazard toy
Greed powder paint
Door and wall scene made from card
Techniques:
I titled the camera to create the Dutch angle and create a sense of chaos / anxiety

Lego ice hockey
Props used:
Lego ice hockey toy
Model trees
Fake confetti snow
Techniques:
I placed the confetti snow in a sieve and sprinkled it onto the scene while snapping away. Thus, creating a real snowfall effect without the use of post-production.

Lego pirate
Props used:
Lego pirate and parrot toys
Real sand and sea on a beach
Star Wars Lego photography
Star Wars is a fan favourite for toy photography. And there's a reason for it - It's fun to recreate the worlds of Tattooine, Degoba and Cloud City.

Lego storm trooper
Props used:
Lego storm trooper toy
A dry wooden log surface with a shallow depth of field to create the sense of an alien world

Lego Darth Vader
Props used:
Lego Darth Vader toy
Bumps on a fallen log
Techniques:
I sprayed water onto the scene to make it look like it was raining. I later added the glowing effect to the light sabre in Affinity Photo.
Traversing a "Galaxy far far away" with more Star Wars toy photography

Boba Fet
Props used:
Boba Fet action figure
Smoke
Techniques:
I used a mini smoke machine to create the atmospheric effect

Obi Wan Kenobi
Props used:
Obi Wan Kenobi / Ben action figure
Inside of a hole in a fallen tree
Mini smoke machine
Techniques:
As with the previous image, I used a mini smoke machine to create the atmosphere. I shot the scene in a hole within a fallen tree to make Ben Kenobi appear as if he is in a dark creepy cave. I later made the light sabre glow in Affinity Photo.

Storm trooper taking a break
Props used:
Storm trooper action figure
Small log
Daisy flowers
Techniques:
This image was shot in a park with daisies defocussed in the foreground to add depth to the image
Creating action packed photographs with figures
Thematic toy photography can also be incredibly engaging. A series of photos featuring a particular character or toy line can tell a cohesive story. For example, a series could depict a superhero in various scenarios — battling villains, saving the day, or even enjoying a day off at the beach. This narrative approach adds depth to the images and allows for a more profound connection with the audience.

Batman
Props used:
Batman action figure
Baking soda
Techniques:
I sprinkled baking soda on the ground to hide the Dark Knight's plastic base around the feet and create the sense of a cold winter's night in Gotham. I chose to include a high rise building in the background to give the impression that there are more similar structures in the metropolis. I shot the image using the titled Dutch angle to create a sense of unease and imbalance.

Army man in a graveyard
This is one of my favourite images and I love the sense of stillness, causing the viewer to reflect on the effects of war. Had the figure been aiming his gun or appearing to be in action, it would have created a different and less sombre feeling.
Props used:
Mini green army man
Fake fur to appear as the grass
Matchsticks to create the tombstones
An open window and shelf to silhouette the scene
Techniques:
I placed the entire scene against an open window to silhouette each object. Thus, giving the characters and narrative a sense of mystery. I later removed all colour in post-production to make the image appear timeless.

Winston Zeddemore, Ghostbuster
Props used:
Ghostbusters action figure
Novelty Halloween torch to project the ghost onto the background
Mini fog machine
Model grit for the floor

Astronaut in another world
Props used:
Spaceman / woman figure
Small white stones
Sand
Cardboard to appear as rocks in the distance
Turquoise plastic clear film
Techniques:
I used plastic clear turquoise wrapping to create the alien looking sky. The folds in the sheet naturally made the whooshing bokeh effect with a shallow depth of field. Thus, adding a sense of wonder to the image.

GI Joe ninja at sunset
Props used:
GI Joe action figure
Fake fur to appear as the long grass
A real sunset
A picnic table to place the whole scene on

GI Jane
Props used:
GI Jane action figure
Soil for the ground
Techniques:
I chose not to light the subject from the front in order to silhouette it and create a sense of mystery. I shot from below, looking up to give the figure a sense of power.
Crafting your own miniature environments

Toy girl with an umbrella in the rain
Props used:
Toy girl wearing a pink jacket and holding a blue umbrella
Spray bottle full of water
Techniques:
I placed the toy on a concrete surface on the side of a bridge to ensure a clear sky was visible in the background without any distractions like buildings or trees. I then sprayed the scene with water to create the rain effect.
I purposely shot at sunset to compliment the toy girl's pink clothing.

T-Rex takes over the city
Sometimes the simple ideas are the best. I'm quite fond of this image as it demonstrates what toy photography is all about - Fun!
Props used:
Pink tyrannosaurus rex toy
Coloured card to create the skyscrapers and sky
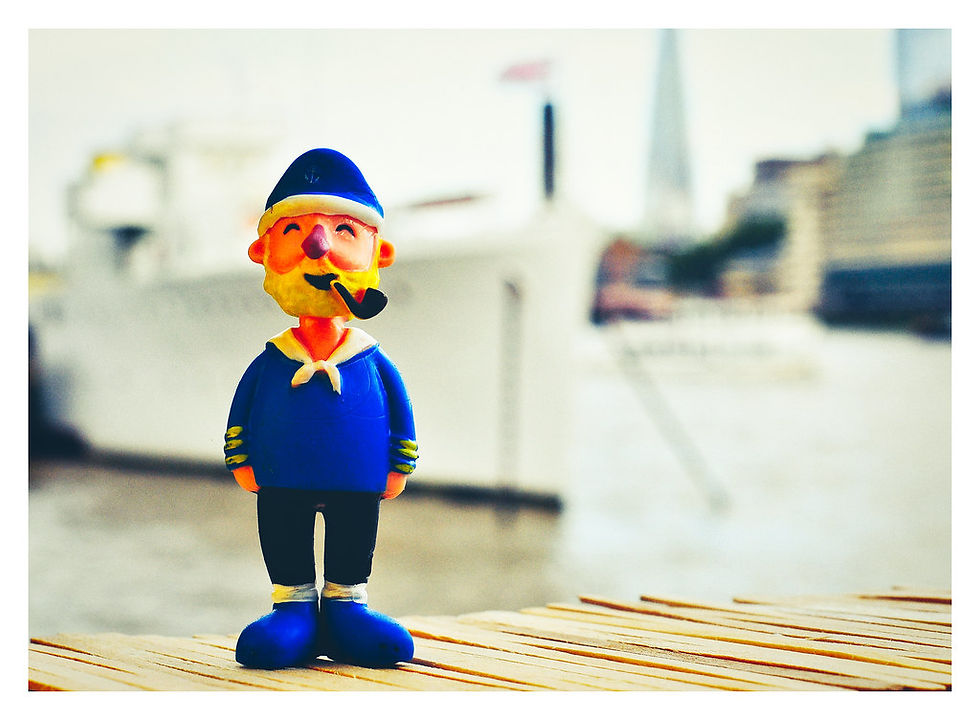
Sailor by his ship in the harbour
Props used:
Rubber sailor toy
Lollypop sticks glued together to create a wooden promenade for the figure to stand on
Techniques:
Shot with a real ship and river in the background to appear as a maritime harbour

Plush chicks
Props used:
Blue and yellow plush chick toys
Yellow coloured card
Exploring real world settings for toy photography
Despite mentioning that I prefer to craft a shrunken world to set my toys within, sometimes these rules can be broken. Here you can see how toy photography can look good within the world of large, realistic items.

Flipflops in the sand
Props used:
Flipflop eraser / rubber toy
Real sand
Techniques:
This image was shot on a real sandy beach in the direction of a sunset

Poo on a toilet seat
Props used:
Poo toy
A real toilet seat
Techniques:
I captured this image with a fisheye lens to enhance the curve of the toilet seat and poo toy, amplifying the comedic effect.

Polystyrene toy plane flying on the beach
Props used:
Polystyrene toy plane
Techniques:
I attached the plane to a stick and held it in front of me, utilising a fisheye lens. In post-production, I removed the stick using cloning techniques.

German toy police car on a wooden surface (polizei)
Props used:
Toy police car

Mini pool kit
Props used:
Miniture pool balls and table
Techniques:
I used macro ring extensions to capture this image, enabling me to get close to the pool balls.
Making magic with Tinkerbell fairy toys

Tinkerbell with her feet in the river
Props used:
Tinkerbell toy
Pebbles
Wooden box
Water
Fairy lights
Techniques:
I crafted the river by positioning a small wooden box on the floor and strategically placing pebbles around the edges to emulate a riverbank. I then positioned the Tinkerbell figure at the center and poured water to give the impression that she was dipping her legs into the stream.
To enhance the magical ambiance, I placed fairy lights at the base of a tree in the background.

Fairy on a wooden surface in the forest
Props used:
Toy fairy
Tree stump
Autumn leaves
Fairy lights
Techniques:
This image was captured at sunset using only natural light, except for the fairy lights. I positioned the toy in a spot where the sun illuminated the forest, effectively capturing the vivid tones and colours.

Tinkerbell on a tree branch
Props used:
Tinkerbell toy
A real tree
Fairy lights
Techniques:
11I positioned Tinkerbell on a tree branch to enhance her downward gaze. I added fairy lights in the background and captured the scene at night to create a magical atmosphere.
Photographing realistic animal toys in the snow
This is where my passion for toy photography began. One year, London experienced heavy snowfall. While in a toy shop, I discovered some realistic animal figurines. I seized the opportunity to experiment with the winter landscape outside.

Toy polar bear in the snow
Props used:
Toy polar bear cub
Real snow
Techniques:
This image captures a small curve on a snow-covered tree branch, emulating a small mound of snow.

Toy wolf howling in a snowy forest
Props used:
Toy wolf
Real snow
Techniques:
Captured on a small mound of snow to simulate a cliff edge in the forest.

Toy baby emperor penguins in the snow by an icey pond
Props used:
Toy emperor penguins
Real snow and iced pond water
Horrific Hallowe'en toy photography
That time of year when everything goes bump in the night is a fantastic opportunity to dive into toy photography. The horror theme will ignite your creativity and send a thrilling shiver down your spine.
As autumn arrives, shops stock up with Halloween toys and decorations, perfectly timed for 31 October.

Spooky skeleton
Props used:
Skeleton decoration
Mini pumpkins
Chalk
Tealight candles
Bathroom powder
Techniques:
This image was meticulously arranged on a tree stump in a dark forest. I outlined a pentagram using chalk around a saucer dish. The candles, pumpkins, and skeleton were strategically placed to enhance the setting.
For the fog effect, I effectively sprayed bathroom powder in the background.
Although the wind challenged the candle flames, I ignited and photographed them individually, then expertly stitched the scene together in post-production. The scene you see above is a seamless composition of nine images.

Halloween ghost in a haunted graveyard
Props used:
Halloween ghost toy
Plastic model pumpkins
Soil
Twigs
Lollipop stick
Techniques:
I spreaded garden soil across a picnic table to establish the scene's foundation. I strategically positioned twigs in the background to mimic out-of-focus leafless trees.
Placing the ghost figure prominently in the foreground, I surrounded it with orange pumpkin models. To complete the eerie atmosphere, I snapped a lollipop stick in two and crafted a cross-shaped tombstone for the background. This setup effectively creates the illusion of a haunted cemetery.

Flying skeleton
Props used:
Skeleton toy
Techniques:
I securely attached the skeleton to a stick and held it in front of me for the photo. Then, I spun around on the spot to achieve the panning effect.

Bloody brain
Props used:
Brain toy
Fake Hallowe'en blood
Glass
White paper
Black backdrop
Spray fog
Techniques:
To craft the base, I used a sheet of glass with white paper underneath, achieving the desired effect of a reflected brain.
I poured fake blood over the top and sprayed canned fog in the background, creating an atmospheric effect reminiscent of Frankenstein's lab. Speaking of which...

Frankenstein's monster
Props used:
Scooby Doo Frankenstein's monster figure
Haunted house decoration
Tealight candles
Techniques:
In the foreground, I arranged garden soil around the monster's feet and illuminated it from the side with a tealight candle. For the background, I used a haunted house Halloween decoration. I captured the image using the Dutch angle to effectively convey a sense of dread and unease in the narrative.
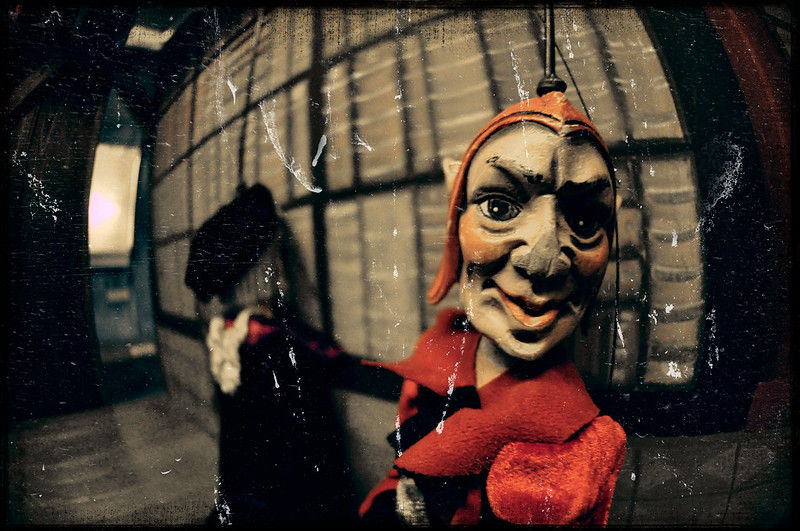
Spooky string puppets
Props used:
String puppets
Techniques:
Captured at the Museum of Prague Ghosts and Legends with a fisheye lens, I enhanced the image in post production by adding scratches and rough edge overlays to achieve a worn and torn appearance.

Hallowe'en witch
Props used:
Witch decoration
Bathroom powder
Techniques:
To create a spooky atmosphere, I sprayed bathroom powder in the background to create the illusion of fog.

Cackling skeleton circus clown
Props used:
Skeleton clown decoration
Garden windmill decoration
Techniques:
I positioned the clown in front of my camera, utilising a tripod and a cable release. I placed the windmill in the background and spun it while employing a slow shutter speed, successfully creating a creepy vortex effect.

Zombie apocalypse
Props used:
Zombie action figure
Sand
Barbeque fire
Techniques:
The background in this image features an authentic fire created from a barbecue. I set a picnic table before the blaze, covering it with sand, and strategically positioned the zombie figure.
Subsequently, I incorporated sparks and smoke overlays during post-production.

Rubber Hallowe'en spider on a glass orb
Props used:
Rubber spider
Glass orb
Techniques:
Retro torn effect created in post production. This image was photographed at the Prague Ghosts, Legends, Medieval Underground and Dungeon Tour.

Ghoul emerging from a coffin
Props used:
Ghoul figure
Wooden mini coffin
Creating Halloween scenes out of dolls' house props
Standard dolls' house items are excellent props for crafting a spooky scene. Here are a couple of homemade haunted mini setups I've created.

Haunted dolls' house mirror
Props used:
Dolls' house mirror
Dolls' house candles
Fake blood
Sticky tac
Stone wall designed paper backdrop

Pumpkin on the TV
Props used:
Dolls' house television set
Mini wooden box
Mini pumpkins
Wooden base
Dolls' house candles
Wall paper printed design on an A4 sheet
Pumpkin face (from a decorated candle holder)
Techniques:
This image is stitched together from three photographs. The first captures the entire scene with the TV, pumpkins, box, wallpaper, and candles. Inside the TV, I added a layer of static along with another featuring the pumpkin face.This image was inspired by the film, Poltergeist.
Constructing a cracking Christmas through toy photography
That special time of year and toys are inseparable. I've created these still life photos to capture the festive magic.

Wooden girl at a Christmas train station
Props used:
Wooden doll with pigtails
Toy train and tracks
Small book (for the train station platform)
Artificial confetti snow
Model trees
Model Christmas village houses
Spray fog
Black backdrop
Techniques:
I lit up the scene from the side with some continuous lights and used a speedlight to brighten things up from the front. This way, I managed to capture the spray fog coming off the side of the train.
At the same time, I was sprinkling fake snow over the scene with a sieve.
With just two hands, I was spraying fog, sprinkling snow, and snapping the shot with my cable release all at once. Creating this image felt like trying to rub my belly and pat my head simultaneously.

Boy and girl dolls in a winter wonderland
Props used:
Wooden dolls
Powdered snow that turns into slush when wet
Green and red model trees
Tissue paper
Yellow card for the backdrop
Techniques:
Anyone who says the camera always tells the truth is mistaken. Just a little defocusing can create amazing effects. Those mountains you see? They're actually just crumpled tissue paper. Using a really wide aperture helped me make them look like snowy peaks.
And yeah, you've caught the red and yellow theme. I picked these colours on purpose to make the image stand out and give off that cheerful Christmas feeling.
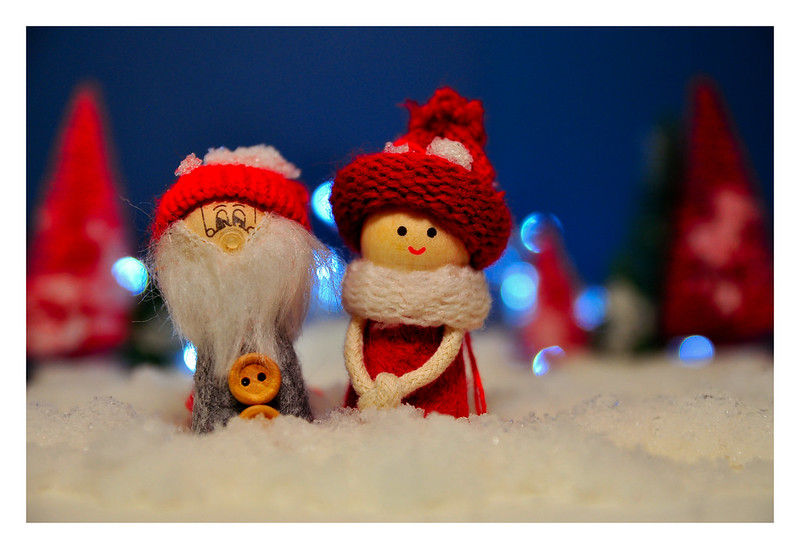
Old man and woman elves in a winter wonderland at night
Props used:
Wooden dolls
Fairy lights
Powdered snow that turns into slush when wet
Green and red model trees
Tissue paper
Yellow card for the backdrop
Techniques:
This picture used the same setup as the yellow photo above. I just switched out the toys and backdrop and added some fairy lights to create a cosy night time scene.

Toy Christmas Train
Props used:
Red toy train and railway tracks
Fake confetti snow
Christmas tree
Fairy lights

Mr and Mrs snowman
Props used:
Two plush toys
Fake snow
Model pine Christmas trees
Coloured card
Fairy lights

Wooden ski toy on the slopes
Props used:
Wooden ski toy
Fake snow blanket / skirt (usually found around the base of a Christmas tree)
Model trees
Coloured card
DVD cases
Techniques:
To get that sloping mountain look, I stacked up DVD cases like steps. Then, I laid a snow blanket over them. For the background, I added another "mountain" using coloured card.

Robin red breast plush toys in the snow
Props used:
Two robin red breast plush toy chicks
Fake confetti snow
Fairy lights
Techniques:
I sprinkled some fake snow over the fairy lights to make the ground look all lit up.

Mario Kart riding through a winter snowscape
Props used:
Super Mario toy and props
Model trees
Fairy lights
Fake confetti snow
Coloured card

Wooden toy Christmas train
Props used:
Wooden toy Christmas train
Fake confetti snow
White tinsel
Fairy lights
White paper

Festive fireplace on Christmas Eve
Props used:
Dolls' house props
Fireplace
Fire grill
Black powder (to emulate ash)
Matt
Lantern
Broom
Wall paper printed on A4 card
Wooden surface
Mini red and gold present decorations
Mini tinsel
Mini Wreath
Mini white Christmas tree
Conclusion
In conclusion, toy photography is not just a fun pastime; it is an art form that celebrates creativity and imagination. By exploring various techniques and themes, photographers can create captivating images that resonate with audiences of all ages. Whether you're a seasoned photographer or a beginner, the world of toy photography offers a playground of opportunities to express your artistic flair.
Like what you see?
Explore this website for more still life images. Be sure to leave your thoughts below in the comments section.


Comments